
2015 OCCASIONS CATALOG

January 6 thru March 31 2015 Click to view
SALE-A-BRATION 2015

FREE PRODUCTS!! Click to view
Thursday, December 17, 2009
Trio Punch Wreath
Wednesday, December 16, 2009
Rudolph Bag Toppers

Aren't these the cutest lil' reindeer you ever did see? These are the treats I made for the Ronald McDonald House Christmas project. The head is made from the Top Note die cut in Soft Suede. The circle punches made the eyes and nose and the Snowflake die cut made the antlers. These bag toppers are easy to make and took me less than a couple of hours to complete. I'm not a glitter gal but I bet the nose would look pretty awesome done in glitter!
Monday, December 14, 2009
Note Pad Holder


I was sick again this weekend so not much stamping....I did manage to make this...I had seen it on Patty Bennett's blog a few days ago. She had the directions and measurements listed...of course she made hers with file folders from the catalog. Mine is just made with cardstock. It's sure a pretty way to cover a plain, inexpensive pad from the dollar store!
Friday, December 11, 2009
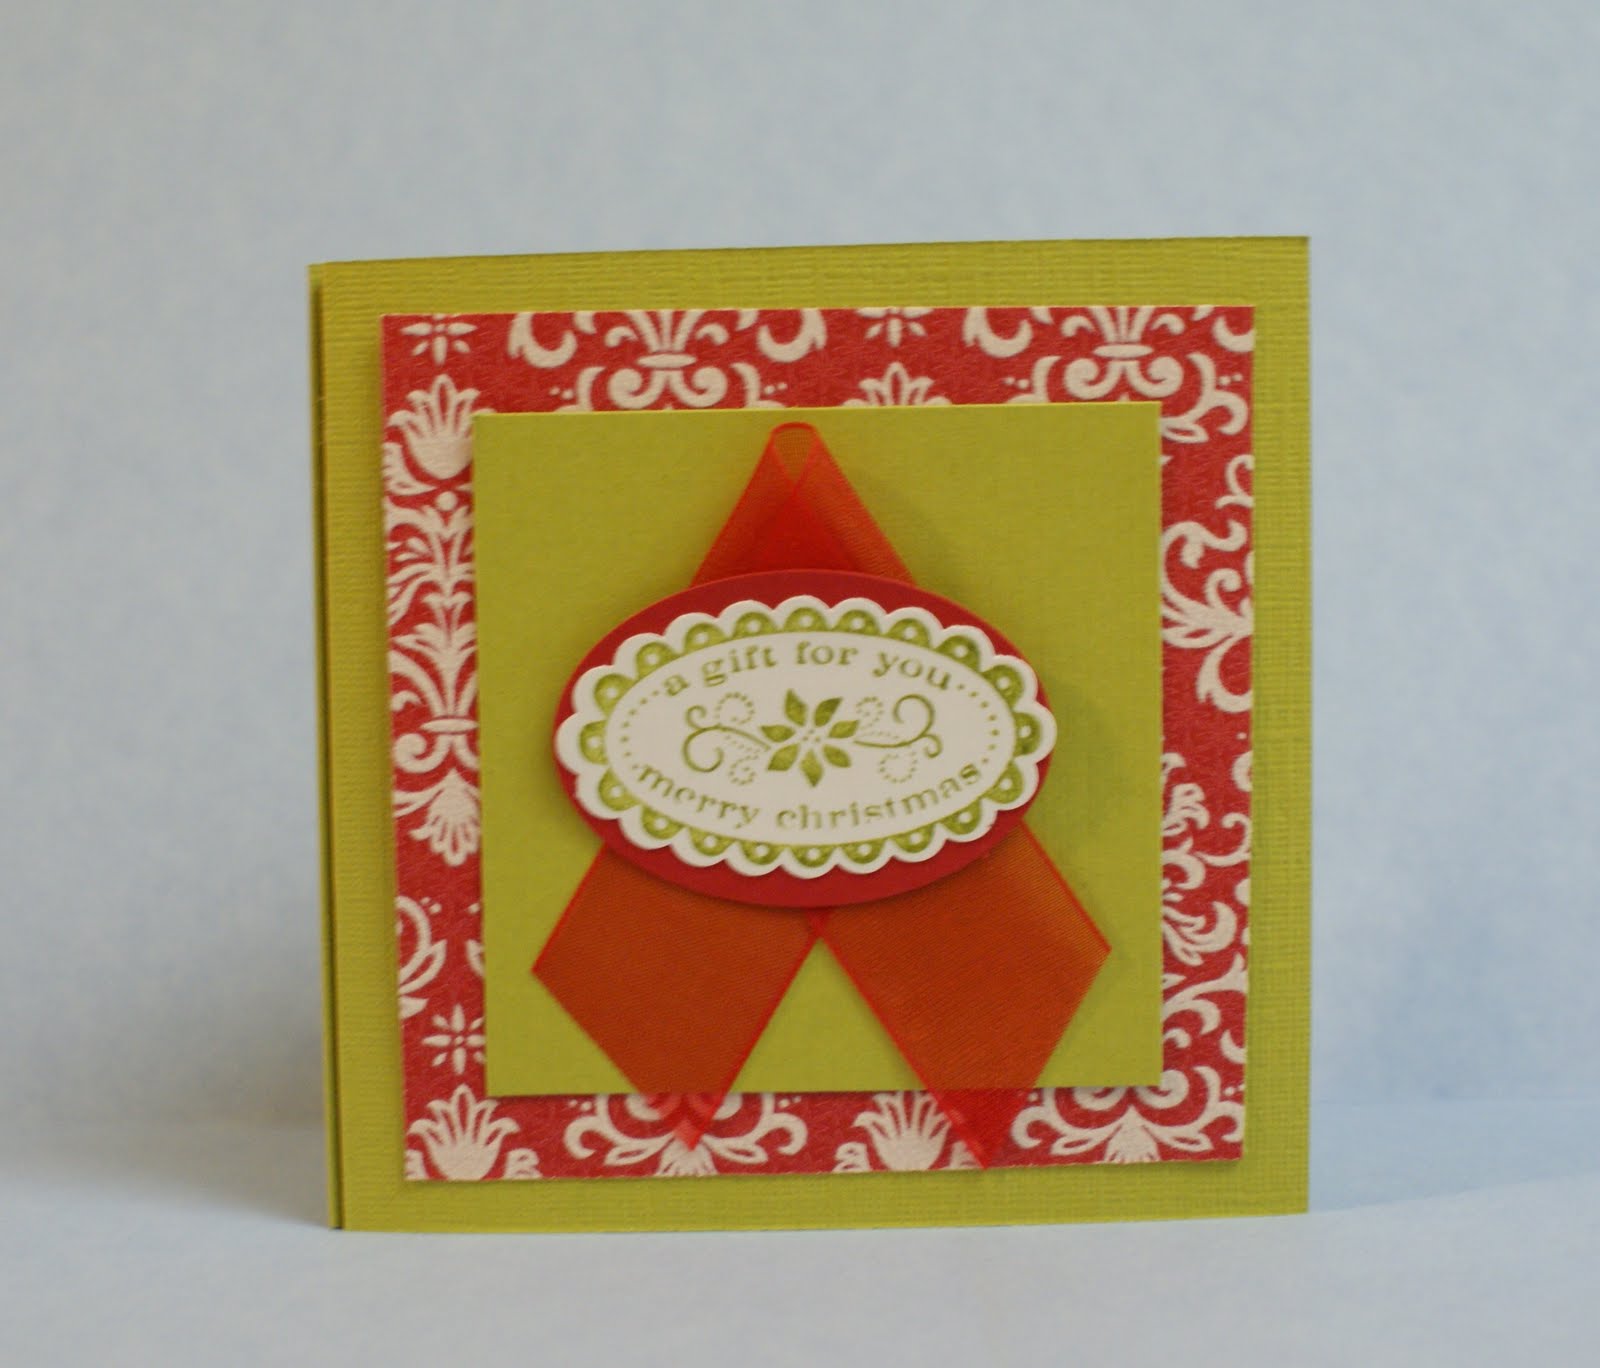
Dasher


When I first saw this stamp in the new catalog, I really didn't care for it much...but now it's really one of my favorites! This card was part of our shoebox swap at our downline meeting...I am sorry to say, I don't know who made it but I totally love it! CS is Chocolate Chip with Old Olive DS paper. The greeting is from Four The Holidays...and the brads are Designer Filigree.
Wednesday, December 9, 2009
Gift Card Holder

Start with a 4x11 piece of cardstock. Score at 4, 5 1/2 and 6 1/2. On the mountain at 5 1/2 ", cut a slit just wide enough to hold the gift card. On the back side adhere just on three sides. You want to make sure not to put the sticky tape on the forth side or you won't be able to put the card in. Stamp and add embellishments! That's it!
Tuesday, December 8, 2009
Dasher Gift Card Holder


This takes a piece of card stock cut to 7 1/2 x 4 1/2 inches. Score at 3 and 6, folding down to make the front flap and up to make the pocket for the gift card. I added DS paper to the top panel and the panel right before you fold up the pocket portion of gift card holder.
I brought ribbon around through the back of the holders up through the punch holes and tied the ribbon around the fronts to secure them. Dasher was stamped with Chocolate Chip ink corners punched with the ticket punch.
Monday, December 7, 2009
Gift Box With Note Cards


Friday, December 4, 2009
Box In A Bag

These gift bags were made with the tutorial by on Andrea Walford's blog. She gives credit for the original idea to Diana Gibbs, however she altered the dimensions to create her "Purse in a Box". In her tutorial she says she made gift cards and placed them in this bag but I didn't add cards to this. They are just being used for gift bags but i wanted something a little different than your usual store bought gift bag. This is a great bag for a small item or that special gift!
Thursday, December 3, 2009
Pumpkin Patch Christmas

Pumpkin Patch from the Holiday Mini Catty is such a versatile set...This ornament card is stamped in Rich Razzleberry and Pale Plum. The branches are from retired Peaceful Wishes set and snowflakes are from Serene Snowflakes. The greeting is from Four The Holidays. This is the same set that I used for the Birthday card I made a few days ago.
Wednesday, December 2, 2009
Ghiradelli Chocolate Boxes


These are very cute and simple to make. Great for all occasions! The directions can be found at Shelly Hopps' blog: mochamemories.typepad.com It fits three wrapped candies perfectly and the belly band secures it.
Tuesday, December 1, 2009
Snowflake Acetate Card

More Snowflakes! This acetate card is made using Serene Snowflakes stamped in White Stazon. The Ballet Blue center is punched with Eyelet Border punch and the the snowflakes from the Jumbo Snowflake Punch. It's hard to tell from the picture but the snowflake punches are adhered to the inside of the card on the back portion of the card along with a second eyelet border. The greeting is from Four The Holidays.
Monday, November 30, 2009
My Digital Studio

Happy Monday!
OMG! This is my first scrap page using our new "My Digital Studio" software! I can't believe how simple it is and how much fun it was trying the different embellishments and options! I think the best part was having all the materials at your fingertips! How many times have you started a project and found you didn't have enough DS paper or ribbon or something and you have to stop and wait till your order comes in? Not this way....there is always enough of everything and if you didn't like the way it came out, you just delete it and nothing got wasted! There is much to be desired of my photo taking abilities but I am still working on that!
You totally need to purchase "My Digital Studio" if you haven't already....It's totally worth it!
Sunday, November 29, 2009
Origami Christmas Box


We made these boxes in class this past week.
What you will need for this project:
· 12 X 12 piece of patterned paper (double or single sided pattern) for the no-glue Origami Box
· 2 sheets of double sided paper - 5 1/4" x 12" (for the cover, if you are making one of these)
· One sheet of lightweight chipboard - 5 1/4" X 12" (again, for the cover only) (I used a thicker cardstock on this so i didn't need to use chipboard...doubling up the paper made it thick enough.
· Craft glue or glue stick (for cover)
· Ribbon (for cover closure, or you may use another type of closure) I couldn't figure out how to add the PDF file for the diagram for the folds, but if you would like it, send me an email to lorrduran@hotmail.com and I can forward the file to you.
Saturday, November 28, 2009
Birthday Wishes

I needed a quick card for a birthday so I used this new set...Pumpkin Patch, in the Holiday Mini Catty...CS is Brilliant Blue, Crushed Curry and Real Red. The small greeting is stamped with Wow Flowers and punched with Word Punch.
Wednesday, November 25, 2009
Snowflakes!

I told you I was on a snowflake roll! The paper is the Specialty Designer Paper from the Holiday Mini. The Real Red "medallion" is punched with Eyelet Border punch and the snowflake from the Jumbo Snowflake Punch. The greeting is from the Christmas punch Hostess set and it's layered on Real Red punched from wide oval punch. The brads are Rhinestone Brads.
Tuesday, November 24, 2009
Happy Holidays

I'm on a snowflake kick right now so don't be surprised if you see a lot of snowflake cards in the next few...This card was made with Ruby Red, Old Olive CS. The snowflake is punched with the jumbo snowflake punch. The greeting is from Four The Holidays...
Monday, November 23, 2009
Stationary Station Box

This is the stationary set we made at our monthly meeting this week.

a small note pad and a postage stamp holder. It's supposed to have a holder for a pen
but I forgot to leave room for it!

I was surprised at how simple it was to assemble...


Stationary Box using Simply Scrappin' Kit


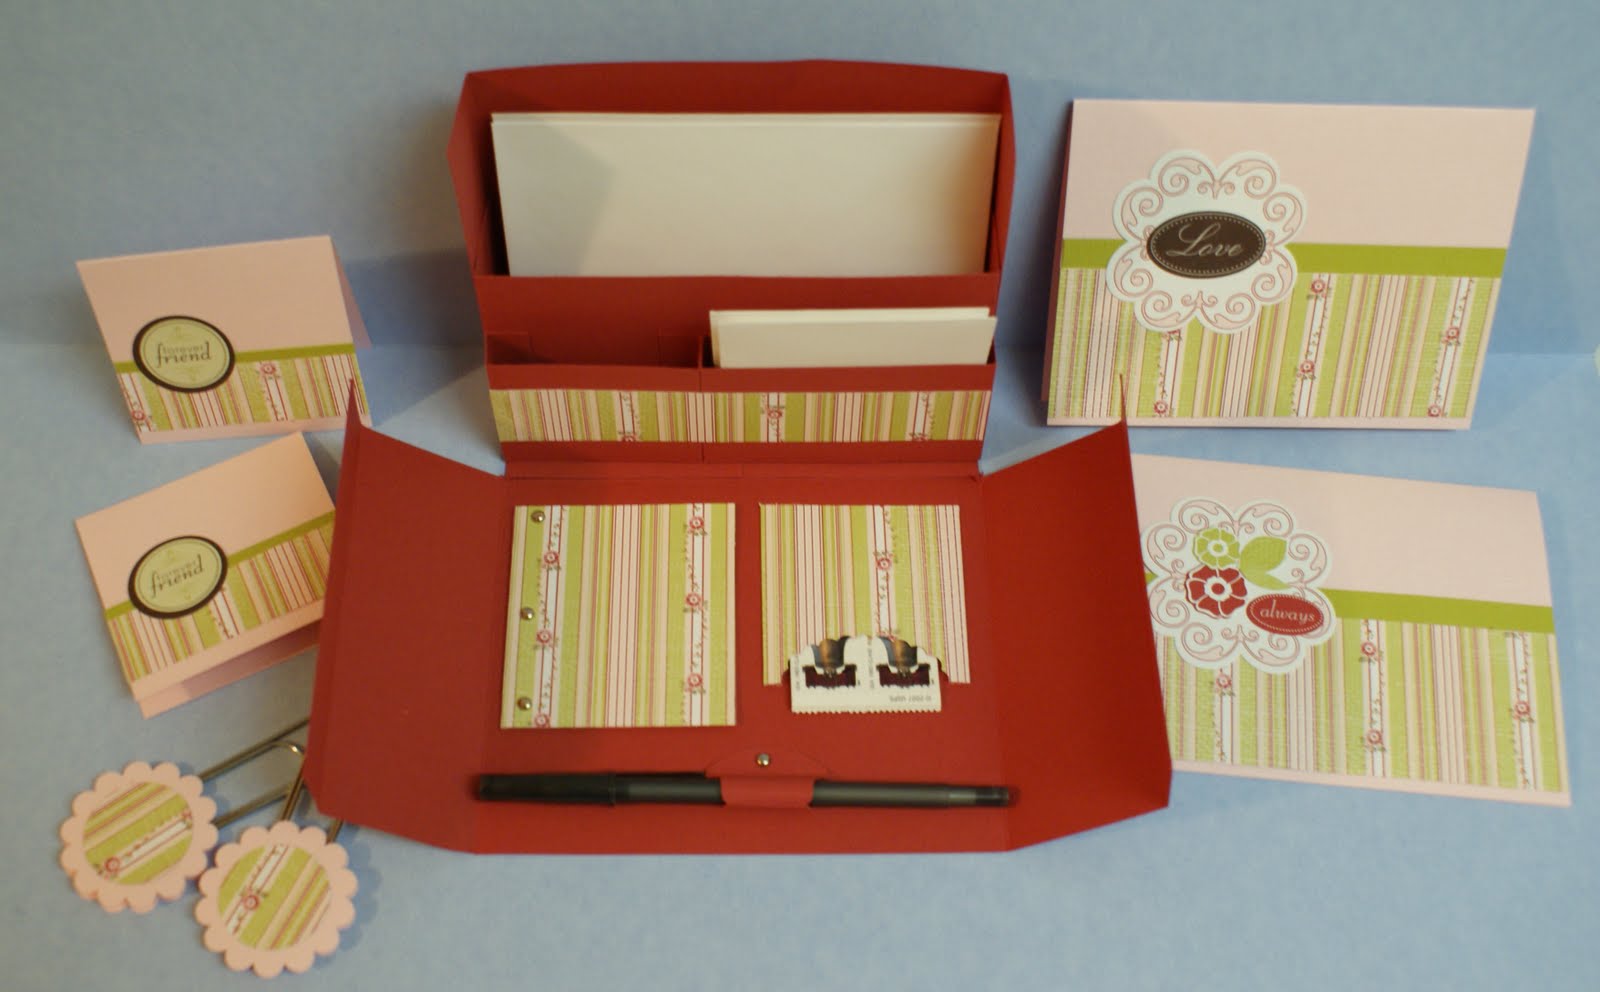
This is another Stationary Box although this one is made using a Simply Scrappin Kit. I made all pieces with paper and adhesive images and still had plenty of paper and embellishments to spare. You can easily make several more cards with the leftovers!
Sunday, November 22, 2009
My Digital Studio

I've just been certified by Stampin'Up! in this great program after going through all the training and then taking the quizzes...I printed my first greeting card and when it arrived, I was amazed at how beautiful the quality!
Saturday, November 21, 2009
Snowman Votive Candle

This little candle is one of the shoebox swaps at our downline meeting on Thursday... I don't know her last name, but "Ariana" brought this for her swap. This is a cute idea, inexpensive, and easy to make using our great punches.
Thursday, November 19, 2009
Magical Marquee Card

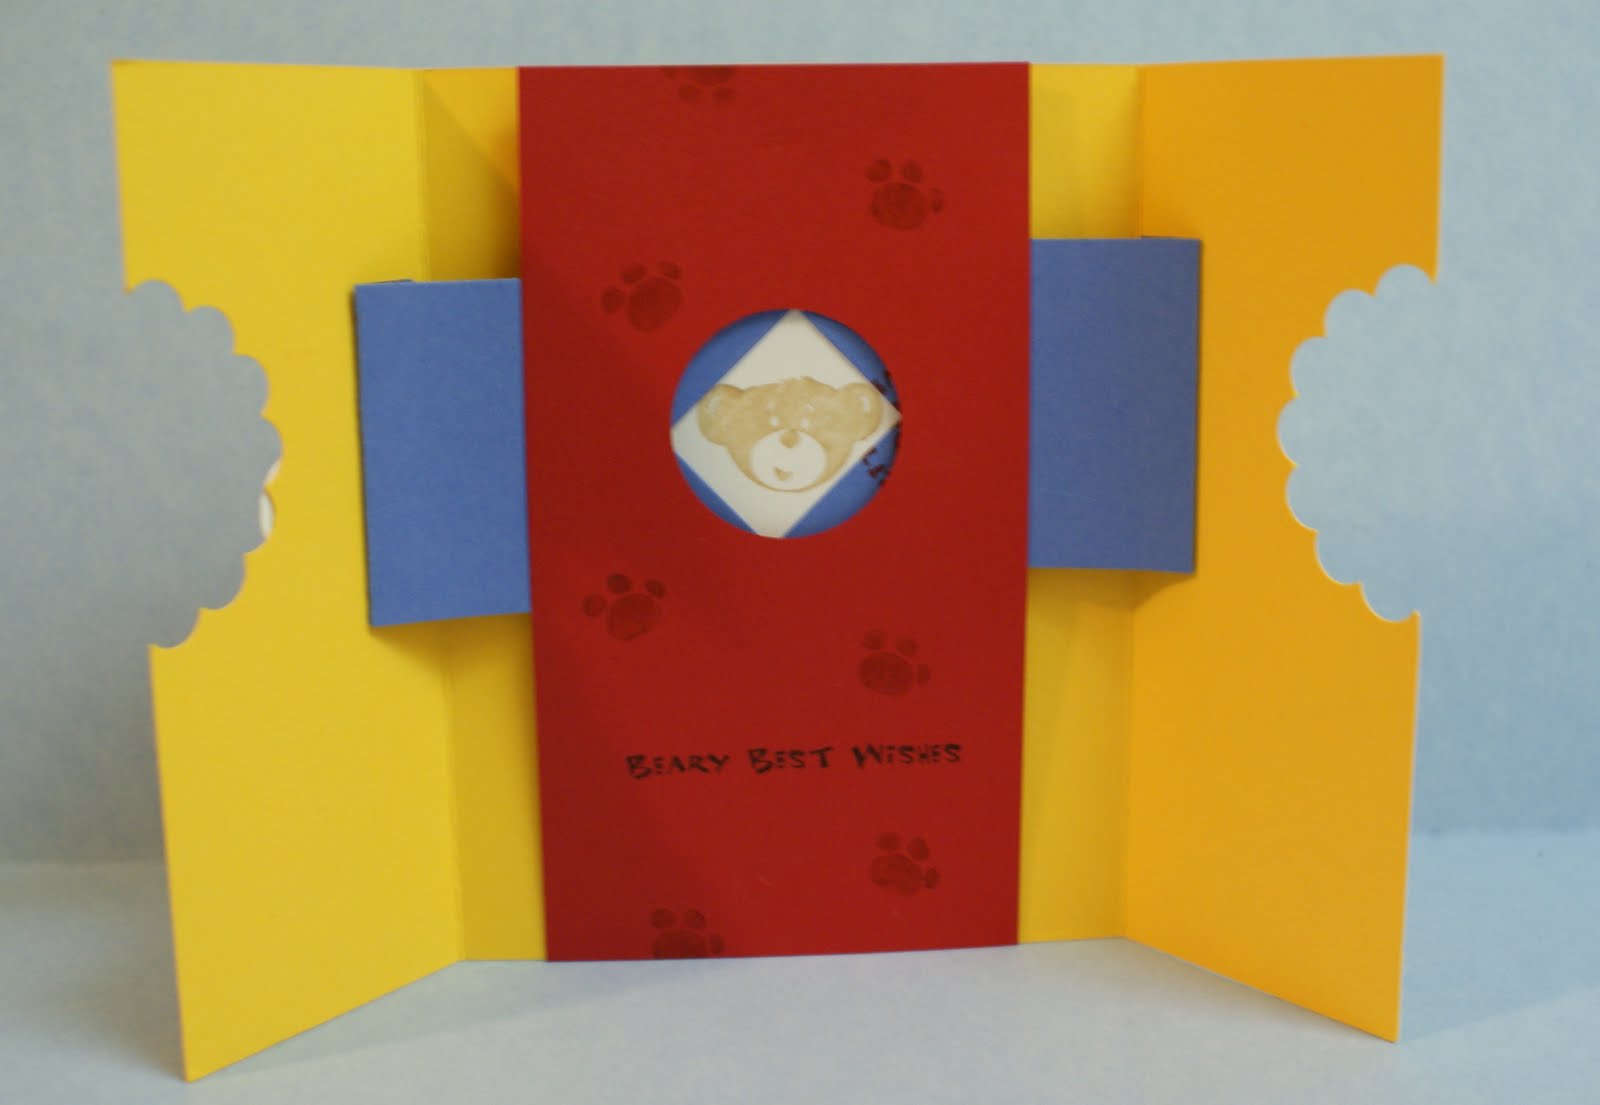
I thought I'd give this card a try....i got the idea from a card posted on Patty Bennetts blog. It gave the link for the tutorial... stamppaperscissors.typepad.com It's Jan Tink's blog! Boy she is such an inspiration! I am always wow'ed when i check out her blog! Anyway, I used the Build a Bear, "Beary Best Friend's" and Beary Nice Wishes and Seal of Pauthenticity sets. The main card is Yoyo Yellow, with inside colors of Real Red and Ballet Blue. Check out her tutorial! And...if you make a card, send me the link! I'd love to see what you did!
Wednesday, November 18, 2009
Suspension Card

Tuesday, November 17, 2009
Faux Postage

I love this Christmas card! Of course, I love anything with snowflakes... This is made with retired Snowflakes set. The tutorial can be found on Splitcoast along with the template. I think I have seen a more recent template...stamps haven't been 39 cents for a while now!
Monday, November 16, 2009
O' Christmas Tree

This tree is made from the heart punch. I punched what seemed like a zillion of them and just layered them on tree shaped cardstock. The edges are brushed with white craft ink. I used the 1/4" punch to make the ornaments and i used a retired star punch for the topper. The background is made with Top Note die cut and placed on a Real Red Card embossed with Petals a Plenty.
Saturday, November 14, 2009
Boho Backgrounds

Friday, November 13, 2009
Eeyore Punch Pal

Like everything else you see, this card was found on Splitcoast stampers. I changed it up a little bit, but I thought this was too cute to pass up! He's made with the oval punches, scallop circle die cut, word window punch, and Boho Blossoms punch.
With Love from Michael

Wiper Card


This is another birthday card that was made for me but i did this seperately because of the technique...this is a wiper card made especially for me by Marle Parrish. Isn't this way too cute! The tutorial can be found on Splitcoast!
Happy Birthday To Me!


These are some great cards made especially for me for my "29th" Birthday by my Wednesday night Stamping group. What a wonderful group of ladies! They brought food and snacks and
a yummy cake from Amy's, my favorite bakery ! Thanks Julie Julie! Thanks to all of you for taking the time to do that! It made my birthday even more special! My birthday was actually yesterday but because of the Veterans Day holiday, our class did not meet on Wednesday so they did it early. I did get to use my "Get into Disneyland FREE on your birthday" pass. I upgraded and bought my year pass which is something I have always wanted to do! We are going on Sunday!
Wednesday, November 11, 2009
Geoffrey Giraffe

This is another punch card found on splitcoast...I altered it a little...the mane is punched with the spiral punch and the extra little pieces were used for his hair up on top. I used the small circle punch for the spots and eyes. The greeting was done on the computer and punched with a circle punch and layered onto the scallop circle punch.
Subscribe to:
Posts (Atom)