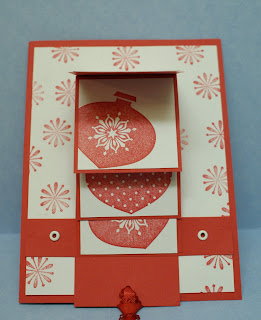
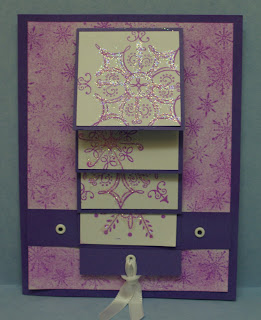
This is a bookmark card we made in class this week. It's very easy to make...Fifth Avenue Floral is my favorite floral set...I used a 5 1/2 x 11 cardstock. I scored it on the long side at 4 1/4 and then made a perforation at 8 1/2. The perforated edge makes it easy to send the card and then tear off the end with the perforation to use as the bookmark. We also used the crayon resist technique on glossy cardstock on this.
Friday, October 30, 2009
Thursday, October 29, 2009
Delightful Decorations
I just love this new set from the Holiday Mini Catalog! I stamped in Rich Razzleberry and used RR Designer paper and cardstock. The ornament is stamped off in RR and hand cut out. I used the new coordinating ornament punch to punch out the ornament on the cover and adhered the stamped image to the inside of the back part of the card. When you lift the lid you only see the ornament.
Wednesday, October 28, 2009
Spiral Pop Up Card
Tuesday, October 27, 2009
Medallion and Delightful Decorations card
Here's another card I stamped using the Medallion stamp and Delightful Decorations. I used the new ornament punch and added a rhinestone brad to the center. I also added a white circle behind the stamped ornament which covers the pattern in the center of the medallion stamp. I think it makes it look like a wreath!
Monday, October 26, 2009
Let It Snow!
Saturday, October 24, 2009
Matchbox Candy Holders
These little candy holders are made from Matchbox die. The the wrapper is made out of acetate and adhered with glue dots. I made the belly band and sealed it with the oval punches stamped with the greeting from Seasons of Joy. The Hersheys miniatures are wrapped with Avery labels, stamped with snowflake stamp from the same set. I made a few of these as give aways for the Christmas workshop but I think I ate more than I made!
Friday, October 23, 2009
Here's another little Thanksgiving treat holder made with the Circle Scallop die cut. The box is made by cutting a 6x7 piece of cardstock...scored at 2 inches on all four sides. Scallop circles are adhered to each side of assembled box. On the front, silk leaves and ribbon to match. The greeting is stamped on oval punch and layered onto scallop oval punch. The handle is made by cutting a strip from scrap material and adhered to box.
Thursday, October 22, 2009
Rudolph Candy Holder


Workshop Pictures
Wednesday, October 21, 2009
Top Note Rudolph
I know this isn't the greatest picture but I forgot the disk to my camera the day of the Christmas card workshop and i used someone else's camera. But thanks to Lety and Ashley for sending me the pictures! Because I got frustrated, I couldn't edit the way I normally do with my own camera...Rudolph is made out of the Tope Note die cut. His antlers are made with Snowflake #2 die cut and the rest of his face with circle punches. I had to cut his ears free hand because I didn't have a die cut to make them with .
Tuesday, October 20, 2009
Autumn in the Air
Monday, October 19, 2009
Thanksgiving Greetings

I got to thinking this weekend...here I am posting Christmas cards and we haven't even done anything for Thanksgiving! I personally have a lot to be thankful for, so I don't want to leave this one out...I don't usually send out cards for Thanksgiving, but this year I am sending a few... This card is made with Pocket Sillhouettes to create the wreathe using Really Rust, More Mustard, and Rich Razzleberry. I used the Sizzix Distressed Textured Plate on the More Mustard cardstock, and the Wide Oval punch for the greeting. Since we don't have a larger oval shape to matte, I cut it out by hand...my hand obviously not so steady! LOL
Friday, October 16, 2009
Seasons of Joy


Wednesday, October 14, 2009
Christmas Wreath
Have you been in the stores lately? We're not even past Halloween and they're already putting up the Christmas displays! I feel like I'm contributing to it by doing Christmas cards so early! This wreath is made with the Heart to Heart punch. I used the long narrow heart to make this...I punched a ring with the circle punches and used several hearts to place around the ring. I used the Final Press embossing folder on white paper and placed the wood frame (Patty Bennett's Altered Textured Impressions tutorial) on big shot to leave the center blank.
Tuesday, October 13, 2009
Medallion
Rich Razzleberry is one of my new favorite "in colors". The base card, the DS paper, and the ink are Rich Razzleberry. I stamped onto Pale Plum CS and cut an extra center and raised with dimensionals. I added a little gemstone to the center.
Monday, October 12, 2009
Build A Bear Box and Bag
Isn't the Build a Bear collection just too cute!! I made these using our die cuts. The blue bag is made with the scallop bag die cut and the border with the scallop punch. The pink box is made with Box #2 die cut. The border is made with the scallop punch on both sides of the strip of paper. I used the Designer label punch behind the circle punches and added rhinestone brads to each side.
Thursday, October 8, 2009
Hinged Cards
Not much time for stamping this week. We have had a lot of activities! I started out my week on Monday just as tired as if it were a Friday. We started a new session of classes at the community center this week. These are the cards from the first week. These Hinged cards are made using the tutorial from Wickedlywonderfulcreations.blogspot.com. The baby card is made from a retired SU set but it's one of my favs. Also the other card with the pocketwatch is retired but i just love the set...I'm not big on masculine cards so this is as close as it gets. The pink card is made with Embrace Life...still a current set in the current catalog.
Tuesday, October 6, 2009
Dahlia Fold
This is a really easy card to make...easy to follow instructions can be found on Splitcoaststampers. We made this card as a make n take at one of my meetings. Check out the tutorial!
Monday, October 5, 2009
Not much time for stamping this weekend. Melissa's activities kept me pretty busy and then was a baby shower for my friend Irma yesterday. By the time we got home neither of us felt much like doing anything. I did have this card made for a swap I did. I had made several but this was not the one I went with. Another Build a Bear card! I used the Top Note Die cut for this and circle and scallop punches on Real Read, Bermuda Bay and Summer Sun CS.
Friday, October 2, 2009
Junior Ring Ceremony


Thursday, October 1, 2009
Pillow Box Die Cut
These were made using the pillow box die cut. I punched the centers with the Full Heart and Scallop Oval punches. They are also embossed with the SU texture plates and Impressions Folders. I adhered a piece of acetate over the hole and filled with candies and mini cupcakes.


